

Passing by a clearance rack I had the urge to buy this fugly yellow cami . Mostly because it was $2. I don't know what I was thinking. It is the color of a neon dandy lion. A color only a child to wear. Well..... O.k. Make something for a kid out of it , right? And away we go.
This is the evolution of a $2 Cami. A tutorial of sorts.

This is a Woman's XL in size. I pressed it then folded it in half. I cut the bottom off ,leaving 5 inches on top for making straps and roses.


Fold down 1 1/2 inches from the top edge of the bottom , and press. This will then be sewn to create a casing for elastic. Don't forget to leave an opening to thread the elastic.

I used 1 inch elastic that has a soft surface on one side. My sister gave this roll to me years ago. It is used for making sportswear. I love it . It allows you to have the elastic next to the skin without the itch. I think you could find it at one of the big sewing stores.

Measure your girlies chest for the elastic. Use you favorite method to insert through casing and sew ends.

Sew the opening you left for the elastic. .This is what you end up with. At this point you could use your own imagination to embellish or not. It would make a GREAT play skirt. And you can use any T- shirt for this project.
Now for the shoulder straps.
This method is a little tricky but super fast and has a cute ruffle effect.
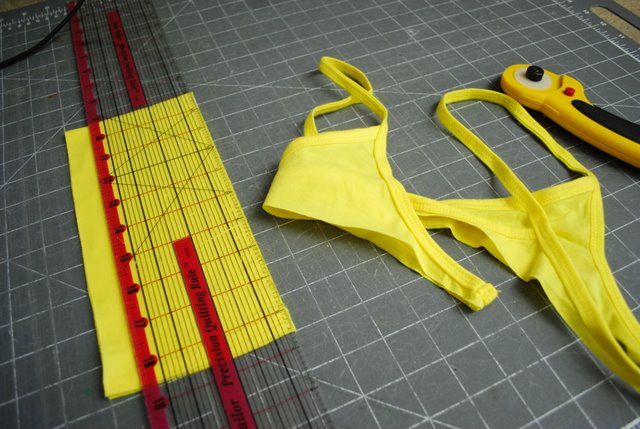
With your leftover piece of the cami fabric cut 4 1/2 inch strip.

Then cut a 1 1/2 inch strip. Cut the pre-sewn seams so that you end up with two pieces.No leftover seams.

My strips measured 18 inches. Then cut two pieces of elastic. 2/3 the size of the fabric. I cut 12 inches.

Pin at one end.Then the other.

Mark centers with pins fold both in half.

Pin together marked centers of both fabric and elastic together.

This is what you end up with. Now off to the machine.

You are going to start by sewing a couple stitches and leaving your needle in the down position. That will hold the elastic and fabric in place.

Now stretch and and sew close to the edge of the elastic. Holding the pined center.Then the end.
When you sew the other side you will need to really keep it going straight. It will want to pull a bit to the side.

Finished product is this cute ruffle strap. The wider the fabric the more ruffle effect you will have.
Now have your girlie try on the shirt. Mark the straps to fit her. Cut of any extra strap and sew on.
Now let's ruffle and rose.

Now cut some 1 inch strips.I cut 2 the cut in half so it was on long strip of fabric. We are going to ruffle them. If you have not ruffled ...this will be so fun.

Set your machine to the longest stitch length. And your tension to its highest setting.
This is a photo of mine.

Just sew straight down the middle. Look how cool this works.

At this point I decided to make roses . But you could just sew the ruffles on anywhere.
For the roses. Roll your ruffles.


After you roll . Put a pin through the middle. The fold the bottom ruffles toward the top ruffles.
If you like it , go to next step.


Hand sew the roses together to secure them. I just sewed the needle through and through. About 10 times. Going all around the rose. Now position on the top.
When you get the effect you like. Make two more. If you like them.

Attach to the top by hand . Like a button.

Perfect swing top for summer.
Pin It