Sunday, September 23, 2012

Broken Bark and Dishes......


Sounds like a party in the woods..........

But, it is just my finished quilt. Finally!!!!!

I think this is the first quilt that I have made, where I took pictures all through the process.
Thank you instagram.

I knew when I started this one, it was for me. My bedroom is dark woods, deep caramel walls and lavender bedding. 
 So, I chose fabrics that were bright and dark at the same time. And had all my colors in it.
I went with......
Heirloom by Joel Dewberry (the ruby palette)
And Bark from his Aviary collection


Since, I am not much for a quilt pattern or even a plan........
I just started playing. 

I came up with the block....

And then played with it some more.....

Had a beverage......... in a mason jar, of course!!

Then sewed a whole bunch!

Sewed it together. Made the binding.....

Thought about a border..... Couldn't decide. So, I skipped it. Pieced the back.


Then quilted it together.  Put the binding on.....
Can you see my squiggly machine quilting? I just loved how it turned out:)

And now..... I have a quilt. Just for me!! :)

Here are a few more pics of my finished baby!!!


 A little shady......


  A moment in the sun.......


 Showing off her backside.....


 Some time just hanging around.....


And a pic of my assistant Brie. Always there with a lint roller, a free hand, and a smile.


Well.......... finishing a quilt is a bittersweet. 
I love that it's done. But, now to begin again. 

I haven' the foggiest idea what my next quilt will be right now. Maybe, I will finish some UFO's..............Hmmmmm.

Hugs and Happy Sewing!!!!


Pin It

Wednesday, September 19, 2012

Playing with Pictures.......


I love taking pictures. I am not great at it, but I try. 
Lately it seems like the harder I try....
The more discouraged I get. Before the digital revolution. 
I took a million pictures, developed them. Chose a couple photos out of the  pack and put them in a album.
Done!   Now, my life of photos has become quite different. 
I take 2 million pictures....look at them in iphoto. 
I think to myself.....man they just seem so BLAH!!!! 
 So, then I get discouraged and yell for Bronte. 
She will pic a few photos and say, "These are great Mom." With that sweet look in her eye that says....aren't you sweet for trying mom. I recognize that look because it is the same one I gave her.... when she was little and 
I was still better at things that her.... 
In this realm, she is superior!! 

Well, I am done feeling sorry for myself!!!

I decided to teach myself a couple things. 
(I can't face that look from Bronte again!!! )
One of the things I decided to learn was how to develop photos in some post processing programs. 
I had pretty low expectations for myself. 
But, I am here to say..... I think I got this!!!!

I first played with Photoshop.... I love Photoshop. I am just barely at a beginner level.  It is a slight bit over my head. 
I did understand and love the using the Actions option in Photoshop. There are TONS of free Actions downloads out there in internet land. And easy to understand instructions.

With my learning curve being a bit of a disability.......

Next, I tried Aperture. I found it super easy and really fun. In Aperture you can use Presets. To adjust your photos. And again there are tons of free downloads out there. Making aperture the easiest to pic up and run with.

Being the curious one.... I had to try Lightroom. 
I LOVE IT !!!!! It is slightly more complicated than Aperture. But, way more beginner friendly than Photoshop. And yet again.......tons of free Presets downloads.

You want to see what this 45 year old barely computer friendly lady taught herself ? 
Please keep in mind.... I am just a newbie.
 And, I learned everything on my own with just the google machine! It amazes me what you can teach yourself with just a little gumption and the internet! Am I right?


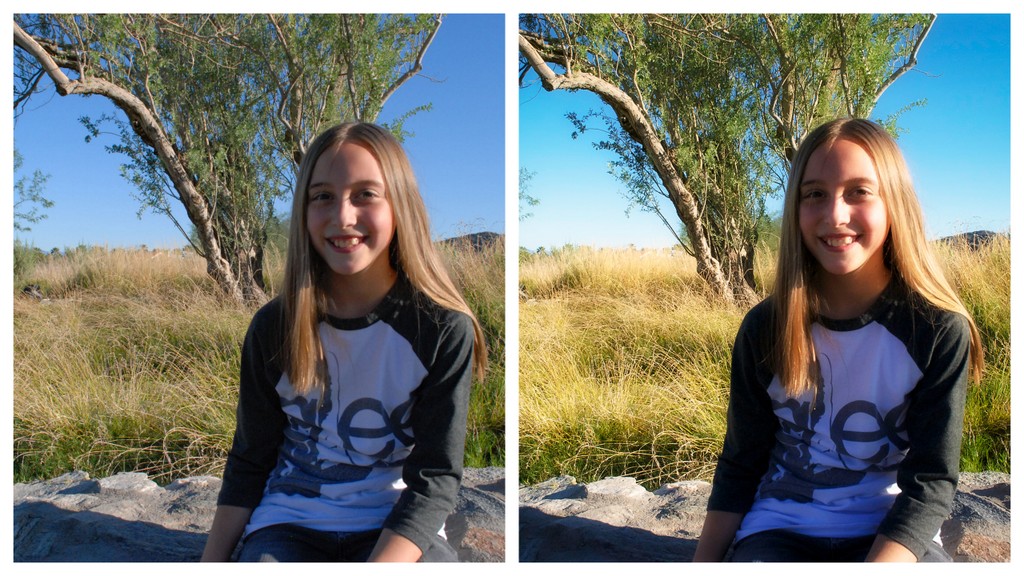
Before / After
 This is a photo of Brooke. Great pic..... But with a little help from Aperture. Better!


 This is a picture I took of Ben. 
I like the original photo (center). I caught some sun rays and sun spots, along with his super cute smile. 
It really did shine more in the Lightroom fix (left). 
The Aperture fix(right) has a great modern vintage feel........
If that makes any sense.


 I took this pic of Brie while out shooting the Mason Jar Cozy. Just a quick spontaneous shot. This one was done with Photoshop actions. I love the golden highlights!!!


I know this probably sounds crazy..... 
This is one of my favorite pictures of Ben. He was just staring off into space. I took it without him even really knowing. 
Something about the fact that it is so candid.
 I can feel him in this one. Crazy I know!!!!
I adjusted it in Lightroom. 
I think by taking out the color ... it focuses on him and the elements around him that I loved. The bricks, parking meters and sun rays. But loses the fray. Like the patrons in the far back. I was also able to sharpen up his face and remove some shadows.
(FYI if you click on the photos they get bigger :) )


Isn't this one a hoot!! 
Brie always has a smile on her face. 
But in this pic that Bronte took. She looks all tough and stuff. Since she looked like a little skater kid..... I wanted to give this pic a old school california dog town feel. 
I think I nailed it!! 

I guess I have learned a couple things.
 I feel way more energized to go out there
 and take some photos!!! 
I may be an old dog....but, I can still learn a new trick or two.

If you are more experienced at this I would LOVE some tips!!!
If you wanna try it like me .... 
I found this free program that can get you started.

I got lucky when I bought my Mac. 
It was loaded with all this cool stuff. 

I hope you enjoyed this post. Even though there wasn't any fabric or food involved......

Have a great week guys!!
Hugs!


Pin It

Monday, September 17, 2012

Winner!!

First off!!! Thanks for all the sweet comments !!! I have the very best peeps!!!

I had a lot of fun reading what you all would drink in a mason jar. I think there is something about sewing and sweet tea........ you girls love some sweet tea.

Anyway...........


We have a winner!!!!!

It is .....Angiepants!!!!

She was #28 ... picked by random.org

So, Miss Angiepants ... Let me know where to send your goodies girl!!!

Hope all of you have a great week!!!! Pin It

Thursday, September 13, 2012

I am Getting Cozy with Mason.....


Mason "jar" that is.............
I have had so many beautiful people ask me how I made my mason jar w/ a straw lid. And y'all loved the cozy :)
So, I thought I would share how I do it.
(Little giveaway at the bottom of this post)


First for the cozy.............
You will need some 3 inch quilt blocks, 
or just a 3 inch square. 
Also some knit fabric scraps or old tee shirts.

I made some 3 inch blocks.........


I added a 1 3/4" x 3" inch pieces of knit to the top 
and bottom of the block.....


The I attached a 6 x 7 inch piece of knit one side of the block.
(this is when my camera died ...oooops)

Once that is done. Fold in half , with the right sides of the longest edges together. Sew . Then turn inside out. Fit it around your jar. Sew a seam right sides together, so that the cozy fits the jar and slides on like a sock.

Speaking of socks. My kids use socks with the foot cut off.... on there water bottles at school. No water rings on there desk or work.

 There you have it ...one way to make a cozy.


Now, for the Straw lid.

I am going to punch a hole on my lid....
and put a grommet in it. 
I am using my old snap press( from my diaper sewing days) and some grommets I found here.
If you go to your local home improvement store..... They can hook you up with a whole kit.


I have this cool little scrapbook tool kit. It has a strong hole punch and little hammer to whack it with. Perfect for metal lids.....


Make sure you have a wooden surface you dont care about. It is going to get damaged.


It is pretty simple. Whack a hole the size of the grommet in the lid.  Remove any sharp edges from the hole. And tamp down edges on the bottom of the lid, you might leave some by making tho hole.


Line up the hole and the grommet. 
Then press. Perfect straw hole.


What the back looks like.......


What the front looks like..........

  
Straw fits!!!


 Put it all together now.......


I found these little red lids years ago. I still had a sealed box in my pantry :)..... there so cute.

Can you see the damage to my board.... I guess I hit it hard enough...lol

By the time I was done, camera was charged......
So, we went for a photo shoot.


4 little cozies..........


Bonus Cozy.....


Pinwheel cozy.........


Shirt sleeve cozy (I used a little stained shirt's sleeve).


Owl Block Cozy........


Paisley Cozy............


Ruffles cozy...........


 And the original cozy........


I hope you liked the mason jar cozy and straw lid post! 
I think they are pretty fun. I never go a day with out one...........

So y'all want one ?
How 'bout this?

Since jars are tricky to send......
I'll send you the ruffles cozy, 12 paper straws. 2 lids with straw holes and 2 packets of my favorite Mason Jar drink. Starbucks Refreshers.....VIA in very berry.
Fun little prize in the mail......right?


O.K. Here is the deal........

Leave me a comment telling me what you would drink in your jar.
If you want an extra try....Like us on Facebook
Third shot?.... Follow me on pinterest or instagram.

I'll choose a winner with Random.org on Monday.

Have a Fantastic Friday!!!!!!

Pin It

Sunday, September 9, 2012

I am seeing dots on dots.......


     Welcome to the Dots on Dots blog hop.


If your here for the first time. Please hang out and look around some. Here at the Moon. There is quilting, sewing, cooking, baking and lots of loving!!!

The challenge of this hop was to make a quilt block with dots. I love dots!!! 

I knew just what I was going to do. I had been thinking about this block for a while. I had seen something like it before. But I could remember where..... and couldn't find a tutorial. 

Soooooo... I took a shot at it, my way. It is a pretty old school way to do it. But, I am going to share what I came up with. I hope you like it!!!

Here is the 12 inch block I made for the hop.
I call this block "Echo Star". 
I used Michael Miller's TaDot in three colors.


First, I drew it out on my beloved graph paper. 
I have every computer program imaginable for these sorts of things....... But, I always go back to a pencil and paper.
 After I thought I had figured it out.......
  
Away I went. Cutting and piecing.


It really doesn't look like its going to 
work at this point.................


But, Look it does!!!!! Isn't she pretty???


If you want to try one......... Here goes!


Old school...right :)               HST ( half square triangle) 

Cut and piece this.....


Star 1

1~ 2 inch square of print 3
4-~1 1/4 inch  Stripy HST's ( one triangle print 3, and the other triangle is  the solid with a print 2 strip ) 
2~1 1/4 HST's print 2 and print 3  
2~1 1/4 HST's solid and print 3
3~ 1 1/4 inch squares of solid 
1~ 1 1/4 inch square of print 2                                                                                   

Star 2

2~ 2 inch squares of solid
3~ 2 inch squares of print 2
1~ 2 inch square of print 1
2~ 2 inch HST's of print 1 and print 2
4~ 2 inch Stripy HST ( one triangle print 2, and the other triangle is a solid with a print 1 strip ) 

Star 3

3~ 3 /12 inch squares of solid
6~ 3 1/2 inch HST's of solid and print 1
3~ 3 1/2 inch squares of print 1


This is how I made the Stripy HST.
Sew 2 strips of a solid and a print.
Using a square or triangle ruler....Cut triangles lining up the seam in the middle of the triangle (slightly larger than you will need) Cut 2 with the solid on the right and 2 with the solid on the left. Sew the stripy triangle to a whole triangle to make the square you need. Square up to the correct size.
That will give you the 4 you need.


Lay Star 1 out first. The pieces are so small.
  It is on my 6 inch square ruler.


Then lay out Star 2 and 3


Then lay it all together. 


Sew together Star 1 ...Add Star 1 to Star 2. Sew Star 2 together . Then add Star 2 to Star 3 then finish up the block.  Square up and your done :)


What you do with your block is up to you. 
I made a Mini quilt for my desk.
 By adding some black around the block to suit me. 
And I straight line machine quilted it.
I used some more TaDot to bind it.

You see, my desk was a mess!!!!


I do everything at this desk. Work, Blog, Sew and all kinds of other things. I thought, if I made it pretty.....
I would be nicer to it. 
Hmmmmm we'll see.


Better huh?

I used some Wonder-Under and a scrap of dots 
to make my mouse pad pretty too.
I Just traced my mouse pad onto fabric. Ironed the Wonder-Under  to the fabric. Peeled the paper off the back and ironed fabric to the old ugly mousepad. 
Good as new. And pretty too!!

Another thing ....... I am a beverage-aholic.
 I always have something drink in my hand 
(It rarely has alcohol in it silly, I know what your thinking....).
Coffee in the morning. And a iced something in my mason jar for the rest of the day. Right now ,
I am hooked on Starbucks refreshers!!! Lime..Yummmmm

I do love my Mason Jar. But, it does sweat. And it is often on something important. Leaving water rings everywhere. 
So, I made a cozy for my jar!! 
And, a coaster for when my jar is really having a sweat.


What do you think ????

My daughter Brie thought I needed some better pictures, since my office is kinda dark.... I think she just wanted to play outside. So, we went outside and shot these.


My Mason Jar loves the outside......


So did my lil' quilt......


And Brie.... likes the outside very much. 

I hope you all enjoyed my Dots on Dots blog hop post!!!
Please visit the other bloggers in the hop!! 
Here are the bloggers hopping today!!!


September 10th
Blueberry Moon ( you are here)


Get the list of Bloggers and the schedule by clicking the badge below.


P.S. If you make one of these blocks, 
I would LOVE to see a picture!!!

Post on my Flickr group Quilt Love
Or Instagram me @myblueberrymoon
Or even email  keithena@theblueberrymoon.com


Pin It